ISBM Commissioning and Production Launch
Como configurar uma máquina ISBM para a primeira produção?
A comprehensive step-by-step commissioning guide covering mold installation, parameter initialization, material preparation, safety verification, and the systematic dry-cycle to full-production startup sequence for injection stretch blow molding machines.
The Critical Discipline of a Methodical First Production Run Setup
Setting up an injection stretch blow molding machine for its first production run is a pivotal event in the life of any packaging manufacturing operation. Whether it is a brand-new machine being commissioned on a factory floor for the first time, or an existing machine being prepared with new mold tooling for a new container design, the setup procedure demands meticulous attention to detail, strict adherence to a logical sequence of operations, and an unwavering commitment to safety. A rushed or careless setup can result in catastrophic mold damage, personal injury, hours of lost production time, and thousands of scrapped containers before a single good bottle is produced. Conversely, a methodical, step-by-step setup procedure ensures that the machine transitions smoothly from a cold, inert state to stable, high-quality production in the minimum possible time. At Ever-Power, a globally recognized Brazilian ISBM manufacturer, our field service engineers have developed and refined standardized setup protocols that are used to commission every machine we deliver, ensuring that our customers achieve first-quality production as rapidly and safely as possible on platforms like the Máquina de 4 estações EP-HGY150-V4.
The first production run setup process encompasses a wide range of activities that span mechanical installation, electrical connection, utility hookup, mold installation and alignment, parameter initialization, material preparation, safety system verification, and a progressive startup sequence that moves from dry cycling through purge shots to full automatic production. Each of these activities must be performed in the correct order, and each must be verified before proceeding to the next. Skipping a verification step can cascade into a problem that is far more difficult and time-consuming to diagnose later. This comprehensive guide provides a complete, step-by-step blueprint for setting up an ISBM machine for the first production run, from the moment the machine is powered on to the moment the first pallet of good containers is produced. It will reference specific procedures for machines like the servo-driven Máquina servo completa EP-HGY150-V4-EV e a alta produção Máquina de 4 estações de fileira dupla EP-HGY250-V4-B.
A disciplined first production run setup is an investment that pays dividends in machine longevity, operator confidence, and sustained production quality. This guide provides the complete operational framework to execute that setup with confidence and precision.
Phase One: Pre-Start Checks, Utility Verification, and Mold Installation
Before any power is applied to the machine, a comprehensive series of pre-start checks and physical verifications must be completed to ensure the machine is correctly installed and all utilities are properly connected.
Electrical, Water, and Compressed Air Verification
The setup procedure begins with a thorough verification of all utility connections before the machine is energized. The incoming electrical supply must be checked against the machine’s nameplate specifications for voltage, phase, and frequency. The voltage must be measured at the main disconnect with a calibrated multimeter. Phase rotation must be verified to ensure that motors rotate in the correct direction. An incorrect phase rotation can cause the hydraulic pump or the rotary table to operate in reverse, potentially causing severe damage. All electrical connections in the control cabinet should be checked for tightness, as connections can loosen during shipping. The cooling water supply must be connected to the machine’s mold cooling circuits, the hydraulic oil cooler if the machine is hydraulic, and the feed throat cooling jacket. The water pressure and flow rate must meet the machine’s specifications. The water quality should be checked. Hard water will cause mineral scale buildup in the cooling channels, reducing heat transfer efficiency. The compressed air supply, required for the blow air system and any pneumatic actuators, must be connected and the pressure verified. The air must be clean and dry, with no oil carryover from the compressor. For machines like the EP-HGY150-V4, the blow air system requires a dedicated high-pressure air supply capable of delivering the final blow pressure of 20 to 40 bar. The dryer, if it is a separate unit, must be connected and verified for correct operation before any resin is introduced into the machine.
Injection Mold and Blow Mold Installation and Alignment
Mold installation is the most mechanically critical step of the setup. The injection mold halves must be carefully lifted into the machine using an overhead crane or hoist, aligned with the platen mounting holes, and securely bolted into place. The mold alignment must be checked with a dial indicator. Any misalignment will cause the mold halves to crash when they close, damaging the precision-machined parting line and potentially the cavity surfaces. The mold water connections must be made, ensuring that the inlet and outlet hoses are correctly routed to provide the intended flow direction through the cooling channels. The hot runner electrical connections must be made, and the thermocouple and heater band circuits must be verified for continuity before power is applied. The blow mold halves are installed in the stretch-blow station, aligned, and bolted. The blow mold base section, which forms the container bottom, must be installed and its motion verified. The stretch rod must be installed and its alignment with the blow mold centerline checked. The neck ring inserts, which grip the preform neck finish, must be installed in the transfer clamps. On a multi-cavity machine, every cavity must be individually verified for correct mold installation. The Moldes personalizados de injeção e sopro em uma única etapa from Ever-Power are precision-machined with dowel pins and alignment features that facilitate accurate installation, but verification with measuring instruments is still an essential step in the setup procedure.
Phase Two: Power-Up, Parameter Initialization, and Dry Cycle Verification
With the utilities verified and the molds installed, the machine can be powered up, the initial parameter set loaded, and the mechanical motions verified through a systematic dry cycle sequence.
⚡Machine Power-Up and Initial Parameter Loading
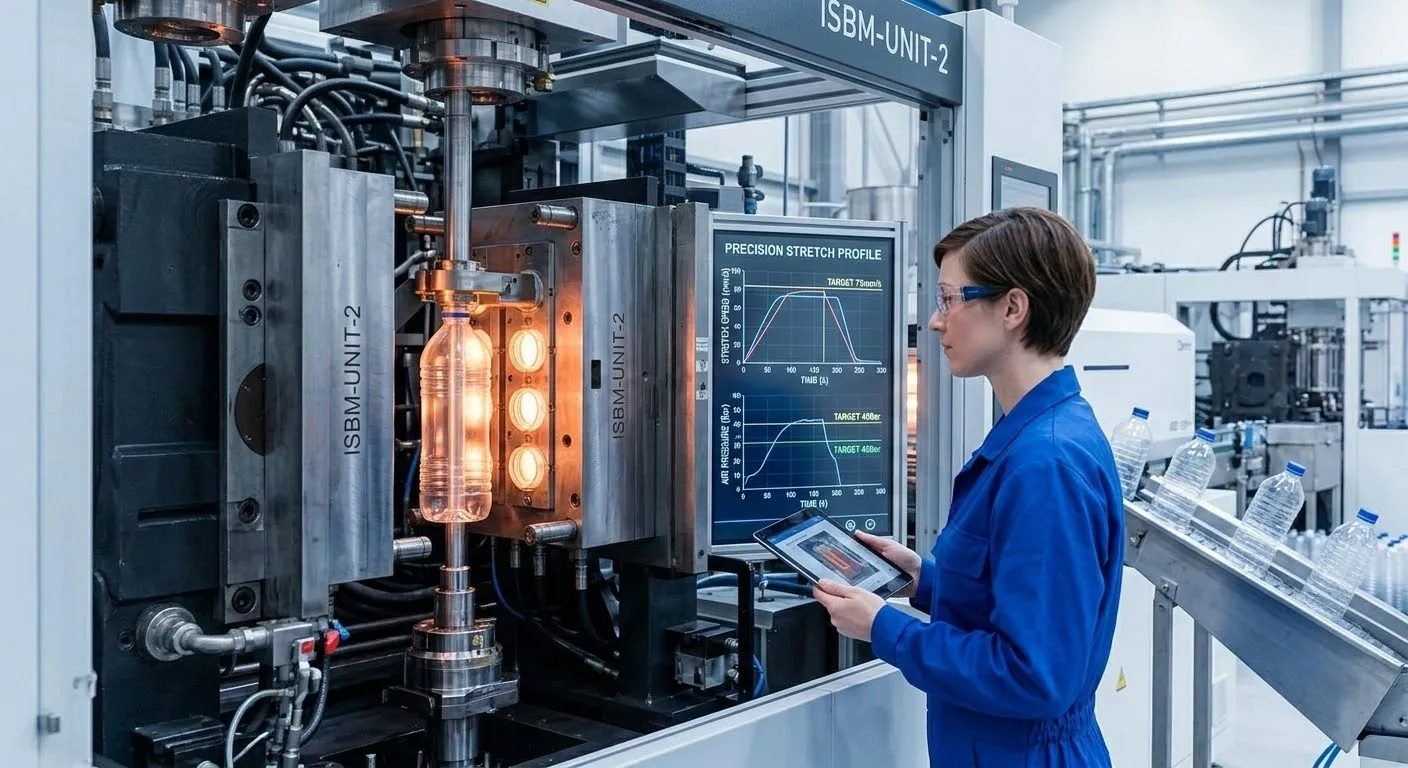
The machine main disconnect is closed, and the control system boots up. The Human Machine Interface screen illuminates, and the machine controller performs its self-diagnostic checks. All emergency stop circuits must be tested at this point. Each emergency stop button on the machine is pressed, and the control system response is verified. The safety gates and light curtains must be tested to ensure they interrupt machine motion when opened. The initial parameter set for the specific container being produced must be loaded into the machine controller. If this is a new container design, the parameters will have been established during mold trials and should be documented in a setup sheet. If the machine is being set up for a previously produced container, the parameter set can be recalled from the controller’s memory. The key parameters include injection shot size and transfer position, injection speed and pressure profiles, hold pressure and time, barrel temperature setpoints, hot runner temperature setpoints, conditioning pot temperature setpoints, cooling time, stretch rod stroke and speed, pre-blow delay and pressure, and final blow pressure and time. On servo-driven machines like the EP-HGY150-V4-EV, the stretch rod motion profile, including acceleration and deceleration segments, is also programmable and must be loaded. The parameters should be verified against the setup sheet before proceeding.
🔄Dry Cycling the Machine to Verify Mechanical Motions
Before any material is introduced into the barrel, the machine must be dry cycled at low speed to verify that all mechanical motions operate correctly and without interference. Dry cycling means running the machine through its complete cycle sequence without plastic. The injection screw is not rotated. The injection unit is not purged. The barrel heaters may be turned on to their setpoints, but the machine is cycled in a mode that disables injection. The critical motions to verify include the injection mold clamp open and close, the rotary table indexing, the conditioning station movement, the blow mold open and close, the stretch rod descent and retraction, and the ejection system motion. Each motion must be observed carefully. The clamp must open and close smoothly, without binding or hesitation. The rotary table must index precisely, with the preform transfer clamps aligning accurately with each station. The stretch rod must descend to its programmed end position without contacting the blow mold base. Any unusual noise, vibration, or hesitation must be investigated and resolved before proceeding. The dry cycle also verifies that the mold safety systems are functioning. If the mold halves do not close completely, the machine should alarm and stop. The dry cycle should be run for at least ten complete cycles to verify repeatability. On high-cavitation machines like the EP-HGY250-V4-B, every cavity position must be verified during the dry cycle to ensure alignment across the entire mold.
Phase Three: Material Preparation, Purge Shots, and Transition to Automatic Production
With the machine mechanically verified, material can be introduced, the barrel purged, and the process transitioned through semi-automatic to full automatic production.
💧Resin Drying Verification and Barrel Heat-Up
PET resin must be thoroughly dried before it enters the injection barrel. If a new batch of resin is being introduced, the dryer must have been running for the specified drying time, typically four to six hours at 160 to 170 degrees Celsius, before the machine hopper is filled. The dew point of the drying air must be verified at the dryer outlet. It should be negative 40 degrees Celsius or lower. The moisture content of the dried resin can be verified with a moisture analyzer. The dried resin is loaded into the machine hopper. The barrel heater zones are set to their target temperatures, and the barrel is allowed to heat soak. The soak time ensures that the barrel steel and the residual material inside have reached thermal equilibrium. For a cold start, this soak time is typically 30 to 45 minutes. The hot runner manifold heaters are also energized and allowed to reach their setpoints. The temperature of each hot runner nozzle is verified on the control system display. Once all temperatures are at their setpoints and have stabilized, the injection screw can be rotated at low RPM to begin conveying dried resin into the barrel. The screw rotation purges the previous material from the barrel. The purged material should be observed for color and consistency. Any black specks or discoloration indicate degraded material in the barrel and necessitate further purging until the melt runs clear.
🎯Semi-Automatic Startup and Transition to Full Automatic
The initial injection shots should be performed in semi-automatic or manual mode. In this mode, the operator initiates each cycle individually, allowing close observation of the first preforms produced. The first several shots will likely be non-conforming as the process stabilizes. The preforms should be inspected for visual clarity, dimensional accuracy, and weight consistency. The shot size should be adjusted to achieve the target preform weight. The injection pressure and speed profiles may need adjustment to achieve complete filling without flash. The cooling time may need adjustment to ensure the preforms are ejected without distortion. Once acceptable preforms are being produced consistently, the machine can be transitioned to full automatic mode. In automatic mode, the rotary table indexes, and preforms progress through the conditioning and stretch-blow stations. The first containers produced should be carefully inspected. The conditioning pot temperatures may need adjustment to eliminate any stress whitening or to achieve uniform wall thickness. The stretch rod stroke and speed may need fine-tuning. The pre-blow delay and pressure may need adjustment. These adjustments are made incrementally, and the effect on container quality is observed over several cycles. On the EP-HGY200-V4, the HMI provides real-time display of all process parameters, facilitating these adjustments. The goal of this phase is to achieve a stable process producing containers that meet all quality specifications before ramping up to full production speed. The first pallet of good containers marks the successful completion of the first production run setup.
Safety Protocols, Documentation, and Post-Startup Optimization
The first production run setup is not complete when the first good containers are produced. Safety protocols must be verified, the setup documented, and the process optimized for sustained production.
Safety System Verification and Operator Training
Before sustained production begins, all machine safety systems must be re-verified under operating conditions. The emergency stop buttons must be tested while the machine is running in automatic mode. The safety gate interlocks must be tested. The light curtains must be tested. The machine must stop immediately and completely when any safety device is activated. The barrel heater covers and hot runner covers must be in place to protect operators from high-temperature surfaces. The area around the machine must be clear of tripping hazards. Operators must be trained on the specific setup, including the location and operation of all emergency stops, the proper procedure for clearing a preform jam, the use of personal protective equipment including heat-resistant gloves for handling hot purgings, and the lockout/tagout procedure for maintenance. The training should be documented. A machine that has been correctly set up mechanically but is operated by untrained personnel is a safety incident waiting to happen. For machines processing rPET on the EP-HGY150-V4-EV, operators must be trained on the adjusted temperature profiles and the adaptive servo control features that manage rPET variability.
Setup Documentation and Parameter Recording
Every successful first production run setup must be thoroughly documented. The final, optimized parameter set should be saved in the machine controller’s memory with a descriptive name that includes the container reference, the material grade, and the date. A written setup sheet should be completed that records all key parameters, including barrel zone temperatures, hot runner temperatures, conditioning pot zonal temperatures, injection shot size and transfer position, injection pressures and speeds, hold pressure and time, cooling time, stretch rod stroke and speed, pre-blow delay and pressure, final blow pressure and time, and cycle time. Any special settings or notes, such as a particular conditioning pot profile for an asymmetric container or an adjusted stretch rod motion profile for rPET, should be clearly documented. This documentation is the institutional memory of the production operation. It ensures that the next time this container is set up on this machine, whether it is next week or next year, the setup can be replicated quickly and accurately. It also provides the baseline for troubleshooting if quality issues arise. At Ever-Power, we provide our customers with comprehensive setup documentation templates and training on parameter management as part of every machine commissioning.
EP-HGY250-V4 e o compacto EP-BPET-70V4 incorporate advanced control features that facilitate rapid, repeatable setups, but the disciplined execution of the setup procedure by trained personnel remains the ultimate determinant of a successful first production run.
Execute Flawless First Production Runs with Disciplined Setup Methodology
Setting up an ISBM machine for the first production run is a disciplined engineering procedure that progresses through utility verification, mold installation, dry cycling, material introduction, and a controlled transition to full automatic production. Each phase must be executed thoroughly and verified before proceeding. The investment in a methodical setup pays immediate dividends in machine safety, mold longevity, and rapid achievement of first-quality production. At Ever-Power, our advanced machinery platforms, including the versatile EP-HGY150-V4, the servo-driven EP-HGY150-V4-EV, and our precision-engineered Moldes personalizados de injeção e sopro em uma única etapa, are designed to facilitate this disciplined setup process, enabling our customers to launch new container production with confidence and efficiency.


